- New Home Server
- Installing Proxmox
- Proxmox Quirks & Configurations
- Shiny New DC
- DNS, DHCP, and Redundancy
- Active Directory Structure and Config
- File server replication with Robocopy
- Windows shares on Linux
- Install Plex on CentOS
- Ubiquiti UniFi Controller
- Centreon Monitoring
- Centreon 2 – Electric Boogaloo
Now that I had my DC setup, it was time to configure DNS, DHCP, and stand up a secondary DC on different hardware for redundancy. I was also changing IPs on my network based on the new scheme I came up with, which I covered in this post. This meant I couldn’t just recycle my old DNS records and DHCP scope.
I opted to setup the new DHCP scope first, primarily because I was still serving DHCP addresses off of my now demoted old DC server, so I could configure the scope exactly how I wanted with it unauthorized. Once configuration was complete and I was ready, I could then just lower the lease time on the old server and then unauthorize it, while simultaneously authorizing the new server and all devices would jump to the new server and pull their newly assigned reservations/or dynamic addresses from the new scope. I also set conflict detection to 2 during this time just to be on the safe side, one everything had migrated, I turned this back down to 0 to improve response time.
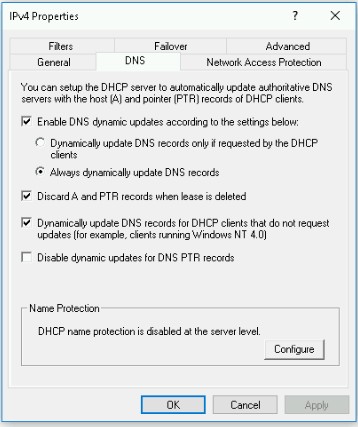
My configuration is fairly run of the mill… I enabled dynamic DNS update options as in the screenshot below:
I set the address pool as 192.168.0.1-192.168.0.254 with exclusions for 192.168.0.200-192.168.0.254 (My Lab/Static Server addresses) and 192.168.0.1-192.168.0.130 (These were reserved for reservations for various devices). I set the lease time for 7 days, added the reservations for various devices, and then set the scope options for Router, DNS servers, DNS domain, and WINS.
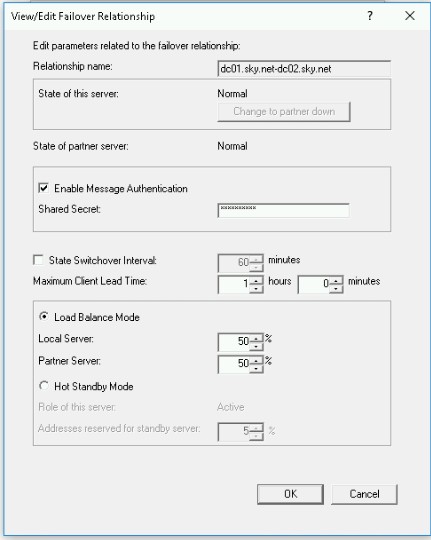
Now it was time to configure failover on my secondary DC. This is just about as easy as it gets. All that needs to be done is to add the DHCP role to the secondary server, then go back to the primary server and right click your DHCP scope and choose “Configure Failover” and follow the prompts. The scope will automatically be replicated to the secondary server after configuration is complete. I chose to use a 50/50 load balance in my configuration and in the end it looks like this:
At this point, I could go in and do some cleanup on DNS. I proceeded to remove all the stale records for devices that had gotten new IP addresses during all of this. Since I had configured Dynamic DNS updates in my DHCP scope, all of the DHCP devices updated themselves. Once the clean up was complete, all that remained was for me to create A records for all of the static devices and servers (and subsequently allow it to automagically create PTR records at the same time) and my DNS configuration was done. The DNS only serves my internal network and is configured to forward any requests it cannot resolve out to Google’s public servers, 8.8.8.8 and 8.8.4.4.
My network is now fully redundant. I can perform maintenance, apply patches, reboot, etc without affecting any of the functionality. This made my wife particularly happy as I wouldn’t have to “kill the internet” anymore if there was an issue with the DC. This wasn’t really that big of a problem before, the main issue being that the old dinosaur used to sometimes have an issue coming back up after a power outage and require some manual intervention. She works from home, so this would sometimes cause problems since there would be no DNS available. However, this would now be a thing of the past. Woohoo for redundancy!


Leave a Reply